docs
Various Yii 3.0 related documentation
Working with forms
This section continues to improve on “Saying Hello.” Instead of using URL, you will now ask a user for a message via form.
Through this tutorial, you will learn how to:
- Create a form model to represent the data entered by a user through a form.
- Declare rules to validate the data entered.
- Build an HTML form in a view.
Installing form package
To install form package, issue the following command in your application directory:
composer require yiisoft/form-model
For Docker that would be:
make composer require yiisoft/form-model
Creating a form
The data to be requested from the user will be represented by a Form class as shown below and
saved in the file /src/App/Controller/Echo/Form.php:
<?php

namespace App\Controller\Echo;

use Yiisoft\FormModel\FormModel;
use Yiisoft\Validator\Label;
use Yiisoft\Validator\Rule\Length;

final class Form extends FormModel
{
    #[Label('The message to be echoed')]
    #[Length(min: 2)]
    public string $message = '';
}
In the above example, the Form has a single string property $message which length should be at least
of two characters. There’s also a custom label for the property.
Using the form
Now that you have a form, use it in your action from “Saying Hello”.
Here’s what you end up with in /src/Controller/Echo/Action.php:
<?php

declare(strict_types=1);

namespace App\Controller\Echo;

use Psr\Http\Message\ResponseInterface;
use Psr\Http\Message\ServerRequestInterface;
use Yiisoft\FormModel\FormHydrator;
use Yiisoft\Yii\View\Renderer\ViewRenderer;

final readonly class Action
{
    public function __construct(
        private ViewRenderer $viewRenderer,
        private FormHydrator $formHydrator,
    ) {}

    public function __invoke(ServerRequestInterface $request): ResponseInterface
    {
        $form = new Form();

        $this->formHydrator->populateFromPostAndValidate($form, $request);

        return $this->viewRenderer->render(__DIR__ . '/template', [
            'form' => $form,
        ]);
    }
}
Instead of reading from route, you fill your form from request’s POST data and validate it with
the help of FormHydrator. Next you pass the form to the view.
For the form to function we need to allow both GET to render the form and POST to send the data.
Adjust your route in config/common/routes.php:
<?php

declare(strict_types=1);

use Yiisoft\Http\Method;
use Yiisoft\Router\Group;
use Yiisoft\Router\Route;

return [
    Group::create()
        ->routes(
            Route::get('/')
                ->action(\App\Controller\HomePage\Action::class)
                ->name('home'),
            Route::methods([Method::GET, Method::POST], '/say')
                ->action(\App\Controller\Echo\Action::class)
                ->name('echo/say'),
        ),
];
Adjusting view
To render a form, you need to change your view, src/Controller/Echo/template.php:
<?php
use App\Controller\Echo\Form;
use Yiisoft\FormModel\Field;
use Yiisoft\Html\Html;
use Yiisoft\Router\UrlGeneratorInterface;
use Yiisoft\Yii\View\Renderer\Csrf;

/**
 * @var Form $form
 * @var string[] $errors
 * @var UrlGeneratorInterface $urlGenerator
 * @var Csrf $csrf
 */

$htmlForm = Html::form()
    ->post($urlGenerator->generate('echo/say'))
    ->csrf($csrf);
?>

<?= $htmlForm->open() ?>
    <?= Field::text($form, 'message')->required() ?>
    <?= Html::submitButton('Say') ?>
<?= $htmlForm->close() ?>

<?php if ($form->isValid()): ?>
    Echo said: <?= Html::encode($form->message) ?>
<?php endif ?>
If the form is valid, you display a message. The rest initializes and renders the form.
First, you initialize $htmlForm with the POST type and the action URL generated with the help from the URL generator.
You can access it as $urlGenerator in all views. You also need to pass the CSRF token to the form, which is also
available in every view as $csrf thanks to the view injections listed in config/common/params.php:
'yiisoft/yii-view-renderer' => [
    'injections' => [
        Reference::to(CsrfViewInjection::class),
    ],
],
The template renders the CSRF token value as a hidden input to ensure that the request originates from the form page and not from another website. It will be submitted along with POST form data. Omitting it would result in HTTP response code 422.
You use Field::text() to output “message” field, so it takes care about filling the value, escaping it,
rendering field label and validation errors.
Now, in case you submit an empty message, you will get a validation error: “The message to be echoed must contain at least 2 characters.”
Trying it Out
To see how it works, use your browser to access the following URL:
http://localhost:8080/say
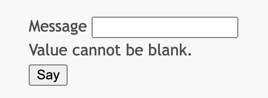
You will see a page with a form input field and a label that indicates what data to enter. Also, the form has a “submit” button labeled “Say”. If you click the “submit” button without entering anything, you will see that the field is required. If you enter a single character, the form displays an error message next to the problematic input field.
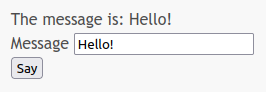
After you enter a valid message and click the “submit” button, the page echoes the data that you entered.
Summary
In this section of the guide, you’ve learned how to create a form model class to represent the user data and validate said data.
You’ve also learned how to get data from users and how to display data back in the browser. This is a task that could take you a lot of time when developing an application, but Yii provides powerful widgets to make this task easy.
In the next section, you will learn how to work with databases, which are needed in nearly every application.
[!NOTE] ← Saying hello | Working with databases →